Kaggle DL Courses

Kaggle Courses

sklearn

结构化数据预处理:数字数据 + 类别数据
注意:为避免Group Leak,这里按演唱者(artists)划分训练集、验证集

1
2
3
4
5
6
7
8
9
10
11
12
13
14
15
16
17
18
19
20
21
22
23
24
25
26
27
28
29
30
31
32
33
34
import pandas as pd
from sklearn.preprocessing import StandardScaler, OneHotEncoder
from sklearn.compose import ColumnTransformer
from sklearn.model_selection import GroupShuffleSplit

spotify = pd.read_csv('../input/dl-course-data/spotify.csv')

X = spotify.copy().dropna()
y = X.pop('track_popularity')
artists = X['track_artist']

features_num = ['danceability', 'energy', 'key', 'loudness', 'mode',
'speechiness', 'acousticness', 'instrumentalness',
'liveness', 'valence', 'tempo', 'duration_ms']
features_cat = ['playlist_genre']

preprocessor = ColumnTransformer(transformers=[
(StandardScaler(), features_num),
(OneHotEncoder(), features_cat),
])

# We'll do a "grouped" split to keep all of an artist's songs in one
# split or the other. This is to help prevent signal leakage.
def group_split(X, y, group, train_size=0.75):
splitter = GroupShuffleSplit(train_size=train_size)
train, valid = next(splitter.split(X, y, groups=group))
return (X.iloc[train], X.iloc[valid], y.iloc[train], y.iloc[valid])

X_train, X_valid, y_train, y_valid = group_split(X, y, artists)

X_train = preprocessor.fit_transform(X_train)
X_valid = preprocessor.transform(X_valid)
y_train = y_train / 100 # popularity is on a scale 0-100, so this rescales to 0-1.
y_valid = y_valid / 100

DL

layers, activations, losses, optimizers, callbacks, metrics
keras.Sequential → model.compile → model.fit → model.predict/model.evaluate

模型构建:网络层(layers)与激活函数(activations)

1
2
3
4
5
6
7
8
9
10
11
12
13
14
15
16
from tensorflow import keras
from tensorflow.keras import layers

# tf.keras.layers: Dense, Conv2D, RNN; Embedding
# tf.keras.activations: relu, elu, selu, swish
input_shape = (2,)
model = keras.Sequential([
layers.Dense(units=4, activation='relu', input_shape=input_shape),
layers.Dense(units=3, activation='relu'),
layers.Dense(units=1), # the linear layer (without activation)
])
# 激活函数可单独拿出来作为一层:
# layers.Dense(units=8), layers.Activation('relu')
# 等效于 layers.Dense(units=8, activation='relu')

model.weights # [w1, b1, w2, b2, w3, b3]

模型训练:损失函数(losses)与优化策略(optimizers)

1
2
3
4
5
6
7
8
9
10
11
12
13
14
15
16
17
18
19
20
21
22
23
# tf.keras.losses: MeanAbsoluteError
# tf.keras.optimizers: SGD, Adam(自适应学习率??)
# epoch, batchsize, learning rate

# configure the model (why 'compile' instead of config?)
model.compile(
optimizer="adam", # 这里无需调节参数,所以简单用字符串
loss="mae",
)

# train the model
history = model.fit(
X_train, y_train,
validation_data=(X_valid, y_valid),
batch_size=256,
epochs=10,
)

# plot the train history
import pandas as pd
history_df = pd.DataFrame(history.history)
history_df['loss'].plot()
# history.history为字典格式,存储loss及val_loss

提前终止:欠拟合、过拟合
输入数据包含信号和噪声信息,无论模型学习到了信号还是噪声的模式都有助于降低训练的损失,但从噪声学到的模式无助于应对新的数据(不能泛化)。未获取足够信号模式表现为欠拟合,而学习了过多噪声信息则对应过拟合,通过对比训练集和验证集损失,有助于判断模型拟合情况。
提前终止EarlyStopping类位于Keras的回调模块(tf.keras.callbacks)。这里所谓“回调”是指在模型训练时调用的函数,通过模型训练fit函数的callbacks参数传入,并在模型训练时进行调用,用于控制/分析训练过程。Keras默认提供了一系列回调函数,也可通过LambdaCallback类自定义简单的回调函数。

1
2
3
4
5
6
7
8
9
10
11
12
13
14
early_stopping = tf.keras.callbacks.EarlyStopping(
min_delta=0.001, # mini improvement threshold
patience=20, # epochs to wait
restore_best_weights=True,
) # 若连续20个epoch,验证集误差提升都小于0.001则终止

model.fit(
X_train, y_train,
validation_data=(X_valid, y_valid),
batch_size=256,
epochs=500,
callbacks=[early_stopping], # put callbacks in a list
verbose=0, # turn off training log
)

特殊网络层
除了全连接Dense、卷积Conv2D等包含神经单元的通常网络层外,还有一些不含神经单元、实现特殊功能的网络层,如随机失活(Dropout)、批归一化(BatchNormalization)。随机失活在某种程度上可理解为众多小网络的集成学习,提升了整体结果鲁棒性;而批归一化则有助于缓解训练的不稳定性,提升训练速度。
Dropout层加在要失活的网络层之前,而BatchNormalization可用于激活后的特征,也可用于激活前(将激活函数拆出单独做一层),甚至作为第一层用于输入数据。注意,这些特殊网络层无需指定单元数(不含神经元)。

1
2
layers.Dropout(rate=0.3)
layers.BatchNormalization()

二分类问题
分类的准确率是离散分布,而损失函数需要是连续的 → 交叉熵(度量分布间差异)。虽然损失函数不能用准确度,但我们可能还是希望通过准确度更直观的判断模型表现,此时可通过度量指标metrics参数指定模型评价标准。

  • 不同于Loss,Metric不用于模型优化,仅用于评估模型表现;
  • Metric可以是任何自定义函数,由compilemetrics参数传入;
  • 不同于Callback,Metric是作为compile的参数传入,而非fit的参数;
  • Loss及所有Metric会在每个epoch结束计算,并保存于history.history的字典中,Metric会以函数名为关键字,当有验证集时会有相应的’val_xxx’项;
  • EarlyStopping(callback)可指定检测标准,默认为验证集的损失(‘val_loss’),可设定为训练集损失(‘loss’),以及训练集或验证集上的其他任何度量函数取值。
1
2
3
4
5
6
7
8
9
model.compile(
optimizer='adam',
loss='binary_crossentropy',
metrics=['binary_accuracy'],
)

history_df = pd.DataFrame(history.history)
history_df.loc[5:, ['loss', 'val_loss']].plot()
history_df.loc[5:, ['binary_accuracy', 'val_binary_accuracy']].plot()

CV

图片预处理

1
2
3
4
5
6
7
8
9
10
11
12
13
14
15
16
17
18
19
20
21
22
ds_train_ = image_dataset_from_directory(
'../input/car-or-truck/train',
labels='inferred',
label_mode='binary',
image_size=[128, 128],
interpolation='nearest',
batch_size=64,
shuffle=True,
)

# Data Pipeline
def convert_to_float(image, label):
image = tf.image.convert_image_dtype(image, dtype=tf.float32)
return image, label

AUTOTUNE = tf.data.experimental.AUTOTUNE
ds_train = (
ds_train_
.map(convert_to_float)
.cache()
.prefetch(buffer_size=AUTOTUNE)
)

迁移学习

1
2
3
4
5
6
7
8
9
10
11
12
pretrained_base = tf.keras.applications.VGG19(
include_top=False, input_shape=(128, 128, 3))
pretrained_base.trainable = False

model = keras.Sequential([
# Base
pretrained_base,
# Head
layers.Flatten(),
layers.Dense(6, activation='relu'),
layers.Dense(1, activation='sigmoid'),
])

数据增强
数据增强通常在训练时执行(online),数据在输入网络前先执行一个随机变换(旋转、翻转、扭曲、调整颜色/对比度等),使模型每次看到都是“新”数据。但需要注意针对特定问题,不是所有变换都有用或合理,而寻找合适增强变换最好的途径就是尝试。
在Keras中数据增强可以融入数据输入的Pipline,如ImageDataGenerator函数,也可以借助预处理层融入网络结构,后一种方式好处是可以自动运行在GPU上。

1
2
3
4
5
6
7
8
9
10
11
12
13
14
15
16
17
18
19
20
21
22
23
24
# Reproducability
import numpy as np
def set_seed(seed=31415):
np.random.seed(seed)
tf.random.set_seed(seed)
os.environ['PYTHONHASHSEED'] = str(seed)
os.environ['TF_DETERMINISTIC_OPS'] = '1'
set_seed()

augmentation = keras.Sequential([
layers.RandomFlip(mode='horizontal'),
layers.RandomContrast(factor=0.5), # up to 1 ± 0.5
layers.RandomRotation(factor=0.2), # up to ± 0.2 * 2pi
# layers.RandomBrightness(factpr=0.2)
# layers.RandomTranslation(height_factor=0.1, width_factor=0.1),
])

model = keras.Sequential([
augmentation,
pretrained_base,
layers.Flatten(),
layers.Dense(6, activation='relu'),
layers.Dense(1, activation='sigmoid'),
])

网络层

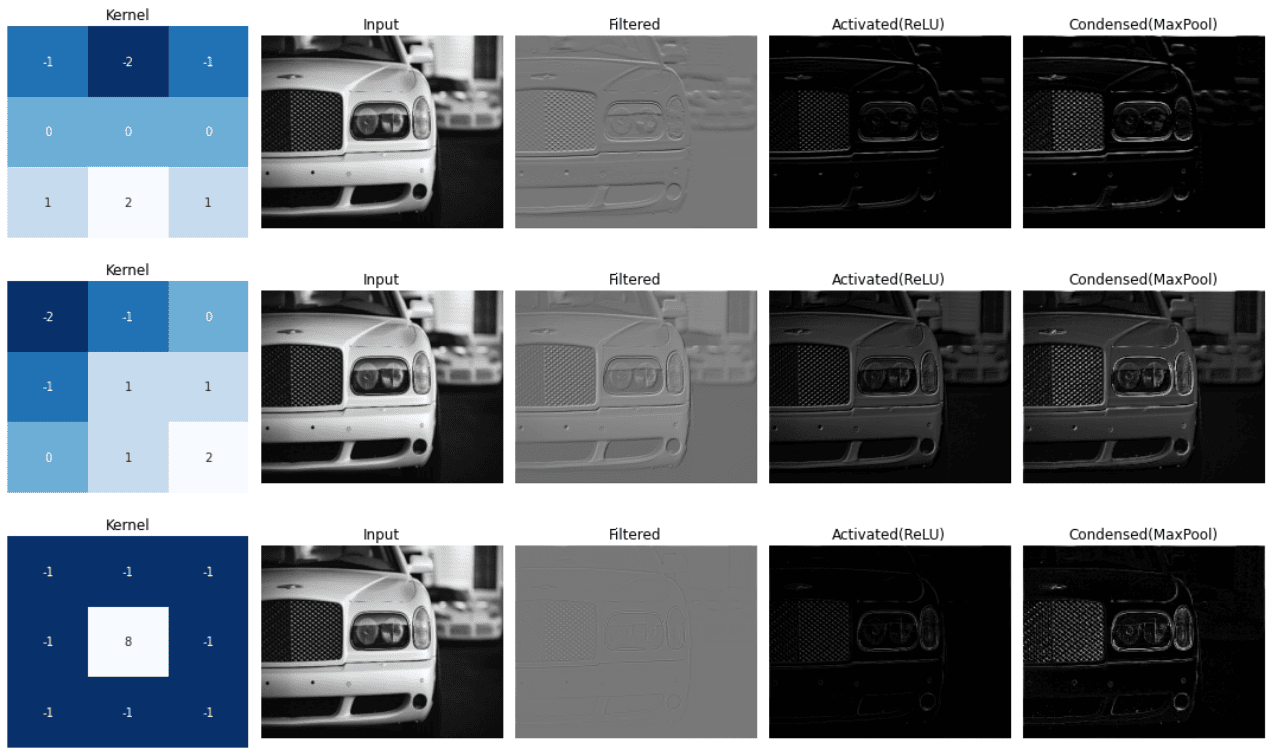
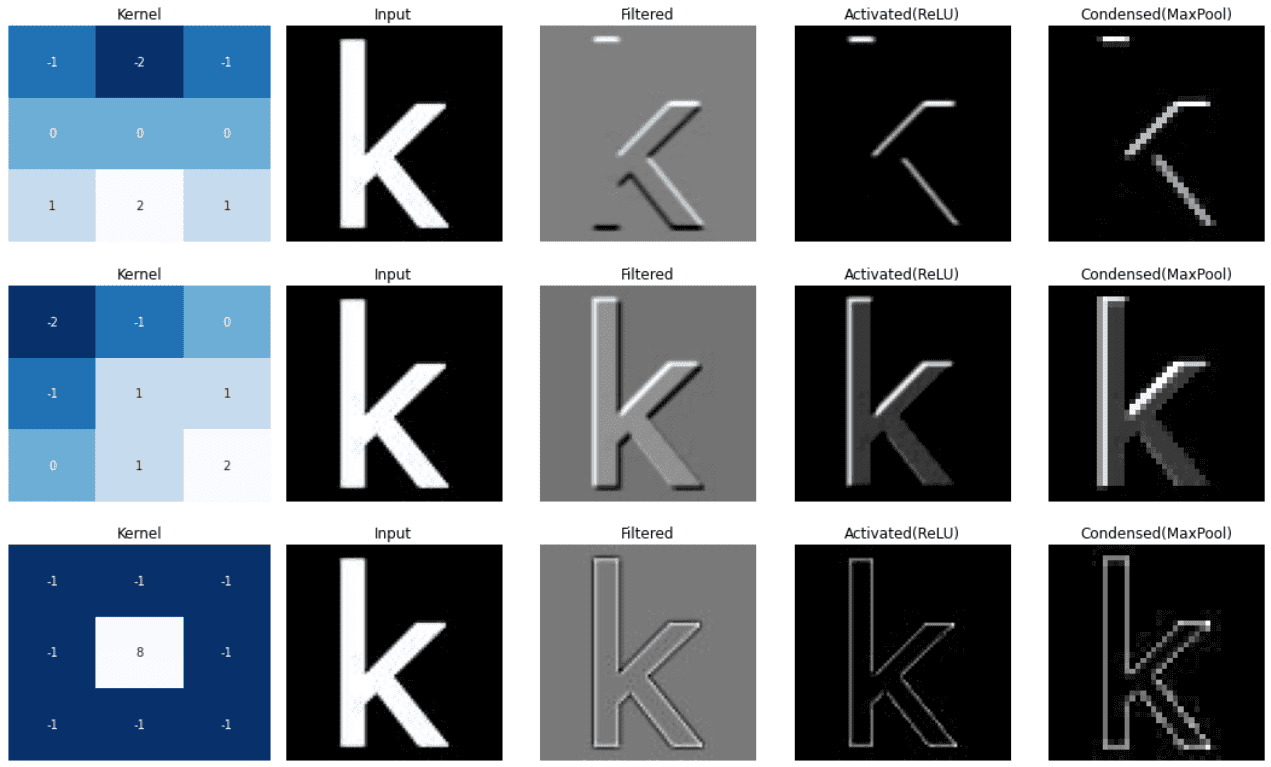
  • 卷积层:针对特定特征(卷积核)进行图像滤波 layers.Conv2D
    layers.Conv2D有两个基本参数filters, kernel_size(对应全连接的units),分别为卷积核的数目和大小,其中卷积核大小通常会取3、5等奇数(有明确中心)。
    另外两个关键参数为步长(strides)和填充(padding),对应卷积核的单次移动距离以及输入图像的边缘处理。输出特征图尺寸 = (输出尺寸 + 两侧填充尺寸 - 卷积核尺寸)//步长 + 1。步长通常取1,填充可选择不填充(‘valid’),此时输出特征图尺寸会逐渐缩减,或者四周补0,保持输出特征图尺寸(‘same’)。

  • ReLU激活:从滤波后图像中检测特征,并输出特征图
    Everything unimportant is equally unimportant.

  • 池化层:压缩特征图以凸显特征(最大池化) layers.MaxPool2D, layers.GlobalAvgPool2D
    经过ReLU激活后,负向特征都变为0,池化操作可以移除这些“无效”信息。另一方面,这些零值虽然与感兴趣的特征无关,但其实包含着位置信息,因此池化操作还引入了局域的平移不变性。(通常取strides大于1,小于窗口自身大小)
    除了常见的最大池化,输出层附近还常使用全局平均池化(GlobalAvgPool)代替展开(Flatten)或全连接(Dense)。全局平均池化以平均值代表整个特征图((batch_size, rows, cols, channels)(batch_size, channels)),可理解为通过一个值指示某个特征存在与否,对于分类而言通常足够了,可以显著减低参数数量,避免过拟合。

1
2
3
4
5
6
7
8
9
10
11
12
13
14
15
16
17
18
19
20
21
22
23
24
25
26
27
28
29
30
31
32
33
34
35
36
37
38
39
40
41
42
43
44
45
46
47
48
49
50
51
52
53
54
55
56
57
58
59
60
import tensorflow as tf
import matplotlib.pyplot as plt
import seaborn as sns

image_path = '../input/computer-vision-resources/car_illus.jpg'
#image_path = '../input/computer-vision-resources/k.jpg'
image = tf.io.read_file(image_path)
image = tf.io.decode_jpeg(image, channels=1)
image = tf.image.resize(image, size=[400, 500])
# 图片分辨率过高,卷积的效果反而不明显!

kernel1 = tf.constant([[-1, -2, -1], [0, 0, 0], [1, 2, 1]])
kernel2 = tf.constant([[-2, -1, 0], [-1, 1, 1], [0, 1, 2]])
kernel3 = tf.constant([[-1, -1, -1], [-1, 8, -1], [-1, -1, -1]])
# 卷积核数值之和对应最终图像亮度,通常不要过大或过小(接近0或1)

kernels = [kernel1, kernel2, kernel3]

def show_img(image, title):
plt.imshow(tf.squeeze(image), cmap='gray')
plt.axis('off')
plt.title(title)

def show_kernel(kernel):
sns.heatmap(kernel, annot=True, cmap='Blues_r', cbar=False)
plt.title('Kernel')

def image_process(image, kernel):
plt.figure(figsize=(15, 3))
plt.subplot(151)
show_kernel(kernel)

plt.subplot(152)
show_img(image, 'Input')

image = tf.expand_dims(image, axis=0)
image = tf.cast(image, dtype=tf.float32)/255.0
kernel = tf.reshape(kernel, [*kernel.shape, 1, 1])
kernel = tf.cast(kernel, dtype=tf.float32)

plt.subplot(153)
image_filter = tf.nn.conv2d( input=image,
filters=kernel, strides=1, padding='SAME')
show_img(tf.squeeze(image_filter), 'Filtered')

plt.subplot(154)
image_detect = tf.nn.relu(image_filter)
show_img(tf.squeeze(image_detect), 'Activated(ReLU)')

plt.subplot(155)
image_condense = tf.nn.pool( input=image_detect,
window_shape=(2, 2), pooling_type='MAX',
strides=(2, 2), padding='SAME' )
show_img(tf.squeeze(image_condense), 'Condensed(MaxPool)')


for kernel in kernels:
image_process(image, kernel)
plt.tight_layout()
plt.show()

Three (3, 3) kernels have 27 parameters, while one (7, 7) kernel has 49, though they both create the same receptive field. This stacking-layers trick is one of the ways convnets are able to create large receptive fields without increasing the number of parameters too much.

NLP

https://www.kaggle.com/getting-started/161466
https://www.kaggle.com/product-feedback/299376

NLP Problems
NLP Problems
NLP for Beginners
Best of Kaggle Notebooks #4. - Natural Language Processing
Best of Kaggle Notebooks #6 - CNNs, LSTMs, GRU, AutoEncoder, Tabnet, UNet
Best of Kaggle Notebooks #7 - HyperParameter Optimization Tools

RL

Ethics

Interview

https://www.kaggle.com/getting-started/124056